How to Choose the Right Spring Check Valve
Choosing the right spring check valve is a small decision with system-wide consequences. The wrong model can chatter against its seat, restrict flow, or allow reverse flow after a pump stops. Selection should begin with the fluid, operating pressure, temperature, flow range, and installation position—not simply the pipe size. A spring-loaded disc may close quickly, but spring strength and pressure drop still matter. Small details count.
The U.S. Department of Energy’s Improving Pumping System Performance sourcebook emphasizes evaluating pumping equipment as part of the complete system. That perspective is useful here: a check valve affects the pump, piping, and maintenance demands together. API 594 provides technical requirements for check valves, while ASME B16.34 addresses pressure–temperature ratings for valves. These standards help frame a reliable specification; they do not replace checking the manufacturer’s test data for the actual duty. A catalog headline is not enough.
Before choosing a spring check valve, compare cracking pressure, rated flow, body material, seal compatibility, and documented pressure loss. Picture the valve closing after a pump trip: will it seat cleanly, or slam against the line? That question deserves a real answer. I can’t verify a named expert’s quotation from the information provided, so I won’t invent one or attribute a general selection tip to a real person. That limitation matters. A sourced quotation and product-specific performance data would strengthen any final recommendation.
What a Spring Check Valve Is and How It Works
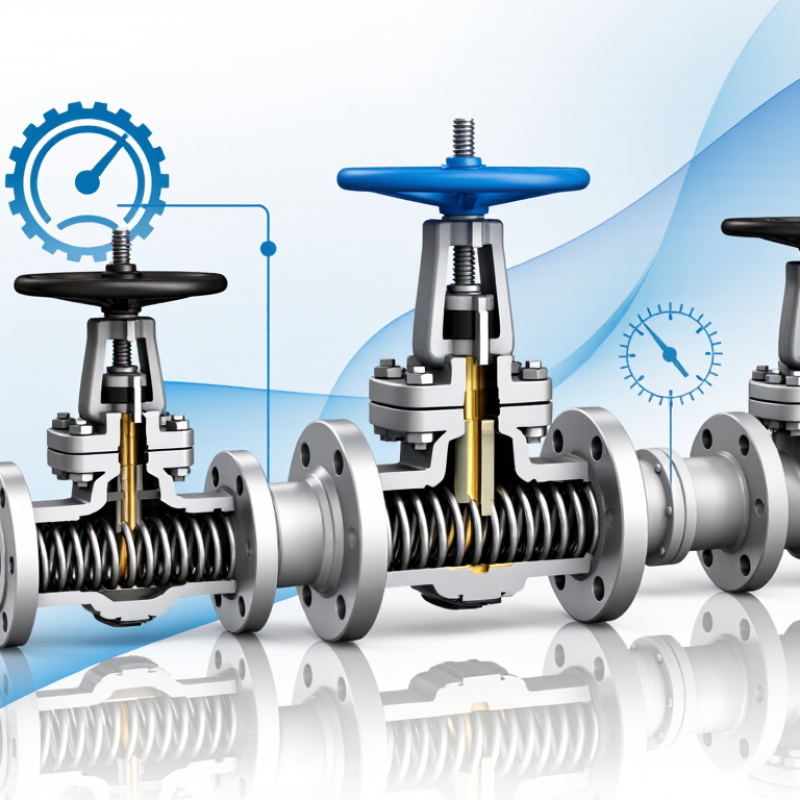
A spring check valve is a one-way valve designed to limit reverse flow. Inside its body, a disc or poppet rests against a seat, held closed by a spring. When fluid pushes forward, pressure moves the disc away from the seat. The spring compresses, allowing flow through the valve. That is the basic action.
When forward pressure falls, the spring drives the disc back toward the seat. If pressure reverses, that pressure also helps keep the valve closed. The seal is not always perfect; dirt, wear, or a damaged seat can allow leakage. A faint rattle or repeated tapping may signal movement, but it does not confirm the cause.
The spring’s resistance affects the pressure needed to open the valve, often called cracking pressure. A stronger spring can help the valve close quickly, yet it may also increase pressure loss during normal operation. In a pump line, for example, that trade-off can affect flow and startup. Not always obvious. Real systems rarely behave exactly like a clean diagram, so check the fluid, operating pressure, flow direction, and mounting instructions before choosing or installing a valve.
Where Spring Check Valves Are Used
How to Choose the Right Spring Check Valve
Where Spring Check Valves Are Used
Spring check valves are common in pump discharge lines, hydronic heating and cooling loops, water treatment equipment, and industrial process piping. Their spring-loaded disc or poppet helps limit reverse flow when a pump stops. In a compact pump room, that quick closure can help reduce water hammer, though system design still matters. The U.S. EPA’s 2022 Clean Watersheds Needs Survey estimated $630.1 billion in U.S. wastewater and stormwater infrastructure needs over 20 years. This is useful context for water-sector investment, not a measure of valve demand.
In HVAC systems, these valves can help prevent unwanted circulation between pumps or branches. In treatment plants, they may protect pumps from backflow in chemical dosing or filtration lines. Select a valve for the fluid, pressure, temperature, flow rate, and installation orientation. Check its cracking pressure too: a spring that is too stiff may restrict flow, while a weak one may not close reliably. It is easy to assume one compact valve suits every line. That assumption deserves a second look.
Tips: Confirm the manufacturer’s flow-direction and orientation limits before installation. Compare the valve’s pressure drop with the pump curve, and leave access for inspection. Small details matter.
How to Identify Your System’s Flow and Pressure Requirements
Choosing a spring check valve starts with real operating data, not just pipe size. Record the system’s normal and peak flow rates, including brief startup surges. A pump’s rated flow may differ from what the line delivers. Measure or calculate flow under actual operating conditions when possible.
Next, establish the pressure available across the valve. A spring valve needs enough differential pressure to open; its cracking pressure is the minimum needed to begin opening. Compare that value with the pressure your system can provide at the lowest expected flow. Too strong a spring can restrict flow and increase pressure loss. Too weak a spring may not suit the required closing behavior. Small differences matter.
Check pressure at startup and during steady operation. Note both upstream and downstream readings, plus the maximum working pressure and any pressure spikes. Fluid temperature and viscosity also affect performance, especially in cold starts. A thick fluid can make a valve respond more slowly. It is easy to overlook this. Confirm that the selected valve’s flow capacity and pressure rating match these conditions, then review the manufacturer’s technical data or ask a qualified engineer to verify your calculations. Real systems rarely behave exactly like the first estimate.
Which Valve Materials and Connection Types Suit Your Application
For a spring check valve, match body and spring materials to the fluid, temperature, and pressure—not just the pipe size. Stainless steel resists many corrosive fluids, while brass can suit clean water and general-purpose service. Neither is universal. Chlorides, cleaning chemicals, and temperature swings can change the choice, so check a current compatibility chart and the valve’s rated limits. Small details matter.
Spring material deserves equal attention. A stainless spring may resist corrosion better than carbon steel, but its grade must suit the process fluid. The U.S. Department of Energy’s Improving Pumping System Performance sourcebook estimates that pumping systems account for nearly 20% of global electricity use. That figure concerns whole pumping systems, not valves alone; still, it reinforces the value of checking pressure drop and cracking pressure. A spring that is too stiff can restrict flow.
Connection type affects installation and service. Threaded ends are compact and practical on smaller lines, but sealant, alignment, and vibration need attention. Flanged ends simplify removal and suit many larger or higher-pressure systems; confirm the flange standard and pressure class. Grooved connections can speed maintenance where the piping system supports them. I would verify dimensions against the actual pipe and leave enough clearance to remove the valve. It is easy to overlook that during a fast retrofit.
How to Choose the Right Spring Check Valve
Approximate upper service temperatures for common valve body materials
These indicative temperature limits vary by material grade, pressure, fluid, and valve design; seals and other components may impose lower limits. For connection type, threaded ends are commonly used on smaller lines, flanged ends allow easier removal for maintenance, and welded ends are often selected where a permanent joint is preferred. Confirm the valve’s pressure-temperature rating and connection standard for your application.
How to Verify Valve Performance, Installation, and Maintenance Needs
How to Choose the Right Spring Check Valve
Verify that the valve’s materials suit the fluid, operating temperature, and system pressure. Check the specified cracking pressure against the pressure available to open the valve. A spring that is too stiff can restrict flow; one that is too light may allow unwanted reverse flow. Compare the valve’s flow capacity with expected demand, not just the pipe size. Small details matter.
After installation, confirm the permitted mounting position in the valve documentation. Some designs tolerate different orientations; others do not. Keep the flow arrow aligned with the system, and remove debris from the line before startup. During commissioning, observe pressure readings and check for chatter, abnormal noise, or leakage. These signs can point to sizing, alignment, or contamination issues, though they do not identify the cause on their own. I still double-check readings after the system reaches normal operating conditions; an early test can miss problems.
Tips: Record baseline pressure and flow. Inspect the valve during planned maintenance, looking for worn spring components, deposits, or damaged sealing surfaces. Follow the manufacturer’s service guidance, and replace parts only when their condition or test results justify it. A tidy installation helps, but it is not proof of reliable performance.